Showing posts with label link parties. Show all posts

Tuesday, April 3, 2012

first upholstery job

upholstery jobs just seem intimidating. i mean right? BUT, i've always wanted to try one because let's be honest.... they are always the best transformations. it's very satisfying to see a before and after that look completely different. so i figured that if i started small... there'd be less of a chance that i'd mess it up. 

p.s. i've tried to take good pictures of our living room and dining room at different times of the day and because i don't know anything about photography or editing... i just can't seem to get the lighting quite right. the light that comes through the windows washes everything out. but oh well, i'm no professional and you get the idea. i hope my attempt to upholster something small will inspire someone! this one was super easy. in fact, it was easy enough to make me want to try it out on the seat of a dining room chair... hopefully a post on that is coming soon. but knowing me, you can't count on anything (meh... must. get. better). linked up here.

behold... the ugly little bench stand thingy,
here it is in it's old, yucky scuffed up state.
before:


so we painted it white and stapled it right up.
(fabric is a thrifted pillowcase)
after:


Photobucket

Friday, March 16, 2012

the lamp of my dreams

Photobucket


so one night when trudy and i were roaming a local goodwill, i spotted this lamp on a shelf. if i was in a cartoon my eyes would have done that googly eyes thing. ya know? the base is a malachite green which happens to be one of my favorite minerals. to make it even better, brass campaign corners add the perfect touch. the white lampshade was not cutting it and wal-mart and target weren't giving me better options. so... i found a local lamp and shade shop. i learned SO much about lamps and shades from the owner. it was a lot of fun. she taught me about scale and proportion. we played around with shade shapes that repeated the base shape but i ended up with a shape that was opposite the base shape (i feel like i'm writing "shape" a lot). it happened to have an extremely reflective gold inside which was awesome because i was planning to line it with gold anyway. i attached some ribbon with fabric glue and voila! i'm very happy with it. i turn it on every night and i love the light that the gold inside puts off. it gives kind of romantic ambiance and it's very relaxing. oh and a few days later i received a card from the shop thanking me for coming in. now THAT's good customer service! these photos are from my iphone (the only camera i'm using these days!) on my instagram. linked up here.

Tuesday, January 17, 2012

changing it up

shortly before grant and i were married, my mom told me that her and my dad had planned to buy us a bedroom set for a wedding present. i was ecstatic. extremely grateful with an extra ounce of guilt. it just felt too generous. which should probably be my parent's middle name. oh i love them. and miss them :(. the set has been great for us. we got lucky here because our bedroom is huge and our set is too. but now that we've finally been able to spread them out and really enjoy them, we'd like to break up the monotony of the pieces. we're prepared for how HUGE of a project this is but excited for the change too. eventually when we buy a house, i'd love to put different pieces in different rooms but we don't have that luxury for now. 

for awhile i've really wanted to find a pair of vintage sconces. i love a little hollywood regency influence but am learning fast that too much of it can go in a gaudy direction. back to the sconces. so one night i was telling grant about my love for them and what i pictured etc. i hadn't really put any effort into searching for some because... well i don't know? not even three minutes later he had found some on ksl (utah's amazing classified source... seriously NOTHING like it in any other state)(craigslist doesn't even hold a candle to it). they were everything i pictured and MORE. czechoslovakian crystal sconces from the 50's. complete with european electrical plugs (we have to use a converter). which in our humble opinion, only makes them better. one thing that makes these eclectic treasures slightly inconvenient is that the light fixtures fit only european size bulbs. but thanks to ebay and only a few dollars we had them here in 2-5 business days. we didn't know where we were going to put them but knew that they belonged in our home somewhere. 

a few weeks later while we were out and about estate sale-ing, we stumbled upon an old junk shop. we were out in the back in a barn when i spotted a big gold mirror on the wall. $15 dollars later it was ours.  after trying every wall and not finding a good spot, we decided to take the mirror off the dresser and put  up our new beauty. after that we added the two sconces and voila! we are planning to change up the dresser but for now, here is our before and during. oh and i better make sure it's known that grant polished every single dusty crystal. which made quite the difference and now the lights are super shiny! and hopefully i will figure out how to conceal or distract away from those annoying bulky cords. linked up here.

before:


during:

Monday, November 14, 2011

my free window treatment

wanna know what i hate buying? curtain rods. especially when you have to get one for every window in your house. they just seem like such a complete waste of money to me. curtains are fun to buy but usually way overpriced (in my opinion). for the kitchen window i planned to use some mustard colored burlap i had. i asked grant to find me a big stick. a cool one. he was more than happy to and found the perfect stick (of course). so we drilled some holes, put some hooks in and hung it up. then i tied strips of the burlap to it. so there ya go. a free window treatment! linked up here.


linked up here.

Tuesday, October 11, 2011

diy anthro inspired dish towel/tea towel

i've seen some diy anthro inspired tea towels around and they've inspired me to do one too. i like to keep design and decor more classic in my home. i feel like i'm always trying to tame this crazy ruffly/sparkly/glammy beast inside me. little projects like these allow me to pull out some of my favorite materials and go crazy(i knew my leopard ric-rac would work for something!). i'm acting like i went crazy with these but i really didn't. anyway i figure that as long as i keep the main things simple (curtains or rugs, couches and chairs) i can have more fun with the little details and accessorizing. i use the same concept when shopping and getting dressed. basically, i've learned with my style that i can only handle so much of anthropologie. in home decor and in fashion.
with this project, the embellishing options are endless. some of these towels i already had, other's recently came from ikea and the dollar store (red & white one). basically you can do whatever you want and create something that is practically free, homemade and more "you" versus the $18 ones at anthropologie.

the tutorial is as simple as sewing any ribbon or trim wherever you'd like. i used liquid stitch too (love that stuff). if this looks like something your interested in and you don't know where to start... i'd suggest heading to your local craft store and checking out all the ribbons and trims. there are soooo many in all different shapes and sizes. another way to come up with ideas is to actually just look at the ones at anthro. it would be easy to straight up copy some of those if you wanted! here are the ones i came up with... i'm really liking the personality they add to our kitchen.


click here to see where I've linked up.

Saturday, September 17, 2011

what outside looks like

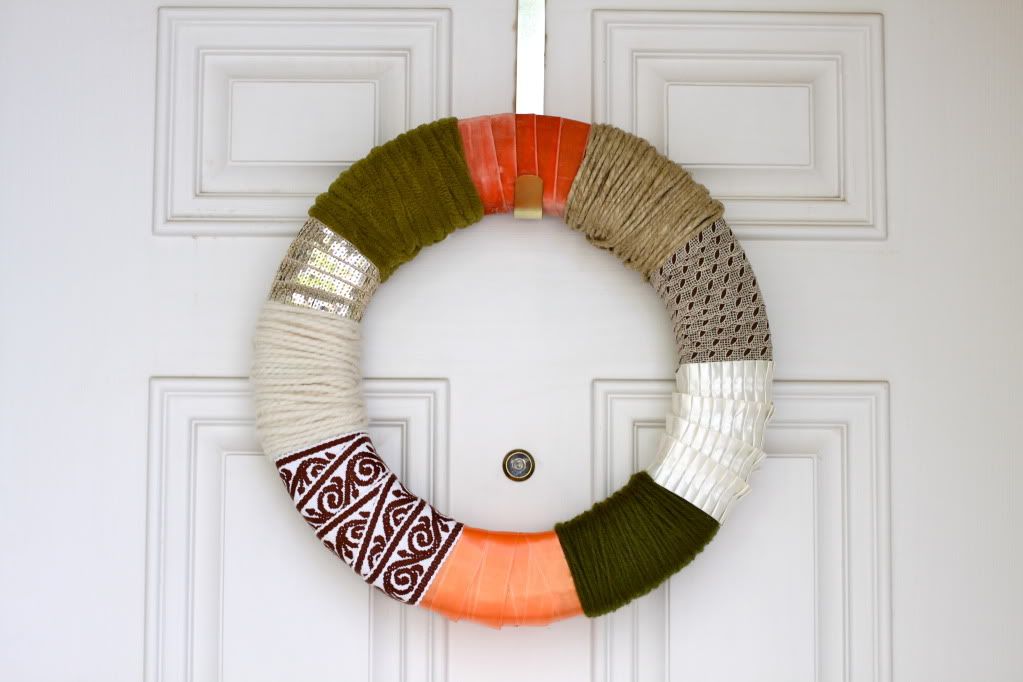
i made this wreath. i'd give a tutorial but i think it's pretty self explanatory. i'm still labeling this post in the diy/tutorial category though. i had all the supplies for this in my craft collection except for the wreath. and i'm not sure that is a good or bad thing. i could spend hours walking down every aisle in hobby lobby (which eventually converts to $$$$$). no wonder it's called "creative center", it really gets my creative juices flowing. i think it kinda makes me a bad mom too because the other day that is where trudy spent her afternoon nap. in the cart. while i mosied around. i think i might (finally) post pictures of the actual rooms in our house. i'm just trying to make a cameroonian hat for a wall and then all should be good. i tried the tutorial on design sponge but it did not work (which was really sad). so we shall see how it turns out, i just love anything with texture. i do not consider myself to be a professional decorator at all, however i love making each room a place that is calm, pretty and "barnesy".

apparently i like design sponge projects... see my first wreath here. and has anyone ever noticed that twine smells EXACTLY like cow manure? like E-X-A-C-T-L-Y. as soon as i pulled it out of my box the house smelled like my grandma's farm. linked up here.
PhotobucketPhotobucketPhotobucketPhotobucketPhotobucket

Saturday, August 27, 2011

stenciled napkins

Photobucket
we've been out of town for the last week and i'm slowly getting back on top of things. i'd probably be caught up on laundry and cleaned toilets if i wasn't distracted by trudy and her smiles. i can't help but spend hours just looking in her eyes and smiling. i think i've said this on here before but i really can't say it enough... she brings me an everlasting joy and it feels so good inside. it doesn't even compare to anything else that could bring me happiness. in fact she makes everything else seem like it's just instant gratification. does that make sense? anyway i'm trying to get a good balance of everything in my life. mommy time, wife time, cleaning time, blogging or britt time etc. i haven't read anyone's blog in forever. i feel bad too but i know i will get to it all soon. i just love being a mom. when i take trudy out and about, i can't help but talk to her. i am totally one of those moms who pushes their kid around the store in a cart and stops ever 5 seconds to say "trudy... i.....love..........YOU!!!" or "peek-a-boo!" or "bleh de bleh de BLEY duh" (don't worry about it, it's just something grant and i say when we stick our tongues out at her). she is just so cute and i can't believe she is all mine!

as usual i have lots of posts that i need to get done. especially in the project zone. we did this a few weeks ago and i love it. one day when i was browsing tj maxx, i saw some plain cream napkins. i've been wanting a very plain and neutral tablescape and i've always loved the emersonmade stenciled napkins. since we already had these stencils and paint... it was easy peasy. i'm loving all the project ideas that come from pinterest too. i think it just lights a fire of inspiration and motivation under our bums. agree? it all reminds me of one of my favorite talks, here is the mormon message from it. his words just make my heart beat fast. he is my favorite. linked up here.

Tuesday, May 31, 2011

dresser before & after

time for a project reveal! since our nursery is quite small, i wanted to get a dresser and use it for the changing table too. we found this dresser on craigslist for $30 earlier this year. i have always been inspired by kate's credenza and really wanted to create something similar. i felt like i needed to choose a girly paint color like pink, purple or even a seafoam green. but when it came down to it... i just had to go with navy. it's my favorite color. i hoped that small details on the dresser would give it some femininity since i was choosing a color that was more fit for a boys nursery. 
kate also has a post on how to paint wood furniture the right way. i love that she takes the time to do posts like that, they are so helpful. after we painted our dresser and drawers with two coats of primer, we drew out the design we wanted to paint on the top on some practice cardboard. then we measured, drew and taped down that design on the top.

 painting was tricky. we did multiple coats of navy. since we knew we were supposed to remove the tape while it was still wet, we made sure to do that. however we removed the tape while it was still wet on it's third coat. if we could go back and do it again we would remove the tape after only one coat, then let it dry, then re-tape and paint again. this is because even though we were SO careful in following instructions and even bought the "edge proof" tape... the navy still bled into the white. which was VERY FRUSTRATING. because then we had to go around with teeny weeny paintbrushes and touch up the entire thing. it took a long time and was my least favorite part.
after looking at the dresser and knowing the end was near, we decided we wanted a little bit more white somewhere else on the dresser. so we taped again! this time we taped around the middle for a sweet little surprise.
after letting that dry. we did two coats of lacquer high gloss to make it as shiny as possible :) we put the new knobs on and brought it in! it feels SO good to be done with this project and i'm hoping that this little dresser lasts a long time with all the effort we put into it. i just finished filling the drawers with adorable outfits and i loved every minute! oh and because the details are the most important part... i added a fun surprise inside the drawers!

to see where it's linked up click here.

Saturday, May 7, 2011

rusting the hardware

i think i've mentioned on here before that grant and i have always wanted to make a barnwood table. we've been obsessed with antiqued/weathered wood forever, it's that gray color mixed with the raw-ness of the wood that has us so attached. we've actually been done with the table for a few months now but we're just now getting around to posting it. anyway so when we went to buy all the hardware, we realized that we couldn't be adding shiny silver brackets and bolts to an old antique table.... i mean that would just be silly! so grant did all this research on rusting hardware and then rusted every little nut and bolt that we used. ya... kind of a process. and i'm not even talking about how hard it was for him to make the table. buying old wood is not like buying new wood. maybe he can explain later how hard it truly was. either way... we have a beautiful table now! :) here is a little video on how to antique hardware. the last part is the best "full reveal of the table... coming soon!" dun dun dun.

we've linked this up to a few parties...
funky junk interiors
chic on a shoestring
craft envy
tatertots and jello
a vision to remember
at the picket fence
flamingo toes
diy showoff

Monday, June 7, 2010

link parties are so much fun!

sunday parties:

the diy showoff
think pink sundays at flamingo toes
making the world cuter

monday parties:

just something i whipped up
motivate me monday
metamorphosis monday
a marvelous mess
amaze me monday

tuesday parties:

tutorial tuesday with hope studios
tip junkie's tip me tuesday
sugar bee craft edition
show me what ya got linky party

wednesday parties:

diy under $5
idea sharing wed @ women who do it all

thursday parties:

20 below thursday
100 ideas under $100
gluesticks!
katie's nesting spot
open house party thursdays
time travel thursday
transformation thursday @ shabby creek

friday parties:

2805
inspiration friday
feathered nest friday

saturday parties:

stitch n' niche
saturday nite special
weekend wrapup party @tt&j
saturday spotlight @ craft envy